lanting a tree in the typical residential yard is not a difficult task. However, because trees are usually more expensive and more permanent than flowering annual and perennial plants, it is important to plant your tree correctly. In the last few years guidelines for planting trees have been revised by the green industry to reflect changes in modern growing practices, nursery materials and a new understanding of soils and plant growth. To give your new tree its best possible start, follow the practices recommended below.
When to plant
In our part of the country it is possible to plant trees during most of the year, as long as the soil is not frozen. As a general rule, the best time to plant is when the tree is dormant. This would be when temperatures are cool–in either the fall or early spring. The tree then has time to develop its roots and become established in its new location before it has to deal with serious cold or heat. Most conifers do best with early fall planting.
Before you plant
Choose your site with care. “Right plant, right place” is the key to success. Consider the mature height and spread of the tree species you have chosen and allow it space to grow properly. Avoid planting under utility wires, in soggy soil or too close to sidewalks, buildings, walls and curbs. You might want to factor in energy conservation and consider putting an evergreen tree on the northwest side of the house where it will block winter wind. Conversely, a deciduous tree placed on the south, southeast or southwest side of the house will shade it from the hot summer sun. Then, after the leaves fall, it will allow the winter sun through to warm the house.
Call 811 (or 1-800-242-1776) before you dig. It is important to determine that there are no underground utilities in the area where you intend to dig the hole. Most likely you will be planting a young, small tree and will not need a deep hole. However, if a contractor is planting a tree with a large rootball on your property his backhoe or tree spade machine will dig more deeply.
Anticipate transplant shock. Whether your tree’s roots are in a container, are wrapped in burlap or are bare in a plastic package to keep them moist, they are only a fraction of the root system the tree would have if it were in the ground. So the tree has been traumatized to some degree when it comes to you. Expect that even with the most gentle care when transporting and planting, your tree will suffer some shock while it struggles to adjust to its new location. Never let a tree’s roots dry out while it awaits planting.
Planting steps
Dig a broad, shallow planting hole. First, remove any turfgrass sod from the planting area. Although the depth of a planting hole must always be no deeper than the root system is high, the width of the hole depends on how the roots of the new tree are packaged:
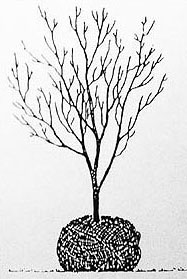
- Rootball that is wrapped in burlap—twice the diameter of the rootball.
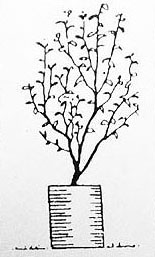
- Rootball that is in a container—about three times the diameter of the container.
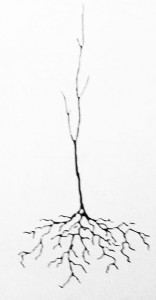
- Roots are bare and in moist packaging—one and one-half times the diameter of the root cluster.
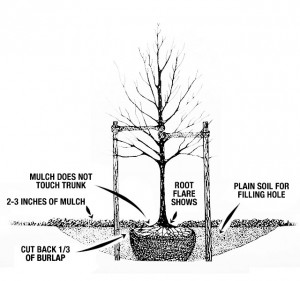
Identify the root flare (trunk flare). This is critical. At the base of a young tree’s stem or trunk its roots begin to spread outward in an obvious way. If this flare is not visible in a containerized or burlapped tree, then brush off the soil on the top of the rootball until you expose at least one major root. The root flare will help you judge the depth of the tree in its hole.
Determine the proper depth of the planting hole. The single most important factor in assuring your tree’s health and longevity is planting it at the correct depth in the ground. The roots flaring out from the trunk must be visible at or, better yet, slightly above ground level when the tree is set in the planting hole. This assures that the spreading roots will be close enough to the soil surface to get the oxygen they need. It also assures that soil will not cover the bark of the young trunk, causing it to decay. Setting the tree slightly above ground level will maintain a proper level in the event that it sinks a bit after watering.
Begin to dig. Remember to dig no deeper than the rootball or root system is high. If the soil is badly compacted make the hole wider (not deeper) and take some time to break it up with your shovel or spade. DO NOT add compost, topsoil or fertilizer to the soil at the site. The tree’s roots must adjust to the reality of the soil in your yard if it is to establish successfully. Remember that tree roots typically grow outward within the top 12 to 18 inches of the soil, so they will be spreading horizontally.
Position the tree in the hole. Set the tree in its hole. If it is balled and burlapped or containerized lift it by the rootball, not by the trunk. When removing a containerized tree from its pot, take a take a minute to check if its roots are potbound. Are they circling themselves or the trunk from being confined to the container too long? Cut through and straighten severely tangled roots before setting the tree in the hole. Then check the position of the tree in the hole. View it from several directions to see if its trunk is straight and its canopy shows to its best advantage. Your tree’s roots may be wrapped in burlap or have a wire cage on them. Be sure and cut away the burlap where it is tied to the tree trunk and covers the top third of the rootball. Cut away the top 18 inches of the wire cage before completely filling the hole with soil.
Fill in the hole with soil. Backfill the hole with the same soil that you dug out of it. Fill the hole to about 1/3 and pack the soil firmly around the roots. Then add more soil. Check to see if the root flare is still at or above ground level, then fill the hole to the top and firm it. If you have some soil left, build a low berm around the planting area to create a shallow saucer that will hold water and allow it to soak gradually and uniformly over the tree roots.
Mulch the disturbed soil area under the tree. A two to three inch layer of some organic material such as wood chips, chopped leaves, pine needles, or shredded bark will protect the disturbed soil at the base of the newly planted tree. It will discourage weeds and, therefore, damage to the trunk from powerful weed trimmers. It will hold moisture, prevent erosion, moderate soil temperature and provide nutrients to the soil under the new tree as it decomposes. Never allow mulch to cover the root flare and touch the trunk of the tree. After laying the mulch at planting time, water the soil over the entire mulched area well—two or three gallons or so. If the mulch layer gets thin over the season, add a bit more to maintain a three-inch layer year round.
Stake the tree? In most residential yards newly planted trees do not need staking for stability if they have good large rootballs and they are properly planted. However, we recommend setting stakes as a precaution until the tree’s root system is firmly established. Certainly, protective staking is in order if the site is windy and if there is a lot of activity by kids in the yard. Use two stakes, inserted opposite one another into the soil out beyond the planted root ball. Use soft flexible material strips to loop around the tree trunk at about where the first branching is and tie onto the stakes about four feet above the soil level. As time passes, adjust the ties on the trunk periodically to be sure that they do not constrict the maturing trunk. Unless you need the stakes for protection, remove them after 8 to 12 months for spring planted trees, or June of their second spring growing season for fall planted trees.
Deer protection. If deer are a potential problem use four stakes and wrap wire fencing around them to make a cage to protect the tender trunk bark from deer rubbing. Rubbing is a possibility from the end of August until January. Raise the level of the wire fencing high enough to protect tips of young tree branches from deer browsing. Leave the cage on during times of great deer pressure until the tree is tall and mature enough to withstand their visits.
Follow up care. Water is critical, especially when the summer heat arrives. If it does not rain, most recommendations are for 3 to 5 gallons a week for a tree with a 2½ inch trunk diameter. Pruning is not normally necessary unless there are broken branches to remove. Check regularly for damage from critters.


